Step-by-step kitchen renovation process explained
Kitchen renovations in Ottawa follow a precise sequence that most homeowners don’t fully understand until midway through the process. The transformation spans 6 to 12 weeks across five distinct phases, each with specific timelines and dependencies. According to the Residential Renovation Price Index published by Statistics Canada, costs increased just 0.5% in Q4 2024—the smallest quarterly rise since mid-2020—making careful planning more achievable for Ottawa-area homeowners.
The most overlooked phase is the infrastructure rebuild behind your walls, consuming 2-3 weeks with almost zero visible progress. Understanding this timeline reality prevents the frustration that derails many renovation projects.
First-time renovators frequently underestimate timeline realities and overestimate the visible progress they’ll see during early phases. The common assumption that demolition immediately leads to installation ignores the critical 2-3 week rough-in period occurring behind walls. Without proper planning, homeowners make premature material selections or rush contractors through inspection-dependent phases that building codes prevent from being accelerated. This guide walks through each phase’s purpose, typical duration, and dependencies.
Your kitchen renovation roadmap in 30 seconds
- Planning phase: Permits, contractor selection, material decisions before demolition
- Demolition: 1-2 weeks of selective removal with utility disconnection
- Rough-in: 2-3 weeks installing plumbing, electrical, HVAC behind walls
- Installation: Cabinets first, then countertop templating, backsplash, appliances last
- Final inspections: ESA electrical approval, plumbing sign-off, walkthrough
The invisible first phase: Planning before the first hammer swings
Successful renovations are won or lost before demolition begins. The planning phase establishes permit compliance, contractor selection, and material decisions that prevent costly mid-project delays. In Ottawa, the building permit FAQ confirmed by the City of Ottawa specifies that permits are required when renovation activity includes installation, erection, extension or material alteration—covering most kitchen projects involving structural changes, plumbing modifications, or new electrical circuits.
Homeowners consistently underestimate the importance of finalizing material selections early. Cabinets, countertops, and appliances must be locked in before demolition to avoid timeline slippage when fabrication lead times stretch 6-8 weeks. Working with established kitchen renovation specialists ensures permit handling and trade coordination happen seamlessly.
Industry best practices recommend building a contingency budget of 15-20% for unforeseen structural issues. According to the 2026 Houzz & Home Study figures highlighted by Kitchen & Bath Business, 37% of homeowners exceeded budgets in 2025, with costlier-than-expected products driving 52% of overruns. Allocating contingency funds and a timeline buffer addresses most surprises without derailing the project.
-
Building permit submitted to City of Ottawa for structural, plumbing, or electrical work
-
Contractor contract signed with detailed timeline and payment schedule
-
Cabinet style, color, hardware finalized (cannot change post-order)
-
Countertop material selected (templating happens post-cabinet install)
-
Appliance models chosen with confirmed delivery dates
Demolition decoded: What actually gets torn out and what stays
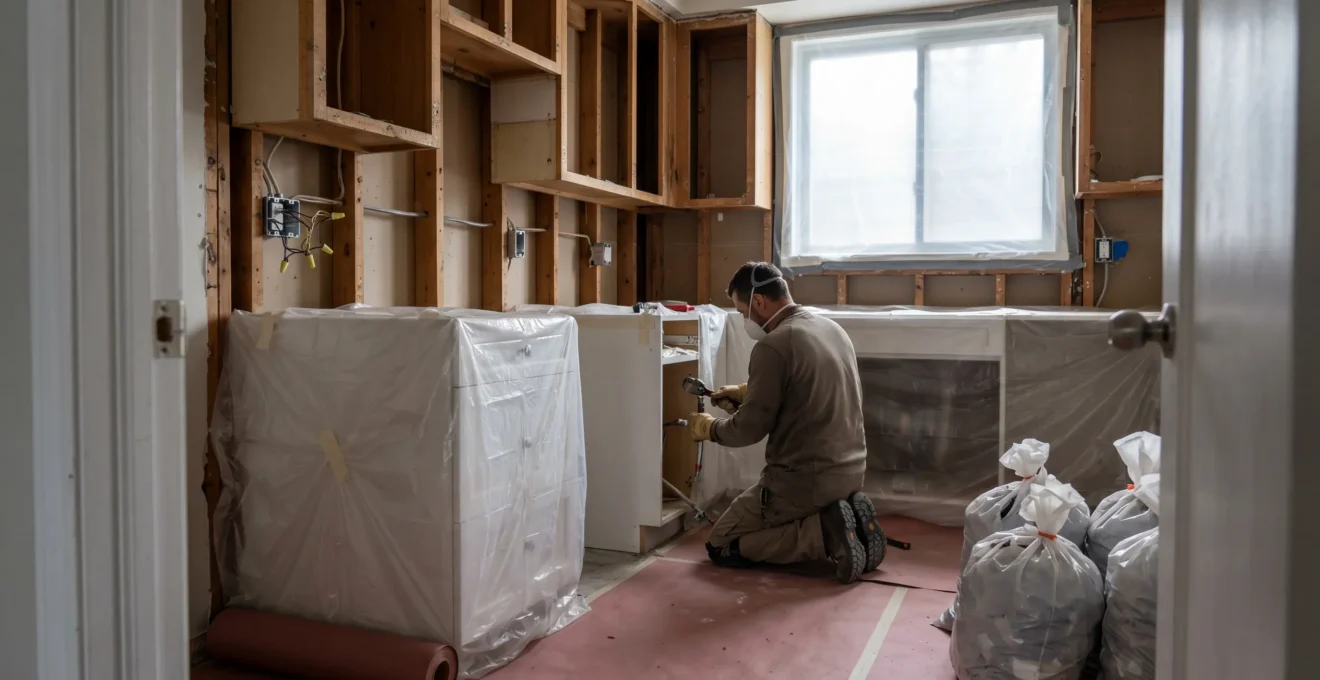
Demolition isn’t chaotic destruction—it’s strategic removal with specific decisions about utilities, flooring, and structural elements. The typical 1-2 week phase involves selective demo: contractors remove outdated cabinets, countertops, and backsplash while preserving structural walls and carefully disconnecting plumbing and electrical.
Professional contractors protect adjacent rooms with heavy plastic barriers and seal HVAC vents to contain dust. Water supply lines are capped, gas lines professionally disconnected, and electrical circuits de-energized before removal.
Can you live in the house? Yes, for most projects. Contractors prioritize dust containment with floor-to-ceiling plastic barriers and HEPA filtration. Setting up a temporary kitchen reduces impact during the 6-12 week renovation.
Demolition work you should never DIY
Three absolute prohibitions: (1) Gas line disconnection—requires licensed gas fitter certification, with explosion risks if handled improperly. (2) Load-bearing wall removal—structural engineer assessment is mandatory, as improper removal risks collapse. (3) Electrical panel work—only ESA-licensed electricians can modify panels in Ontario, preventing electrocution and fire hazards.
Infrastructure rebuild: The work behind your walls
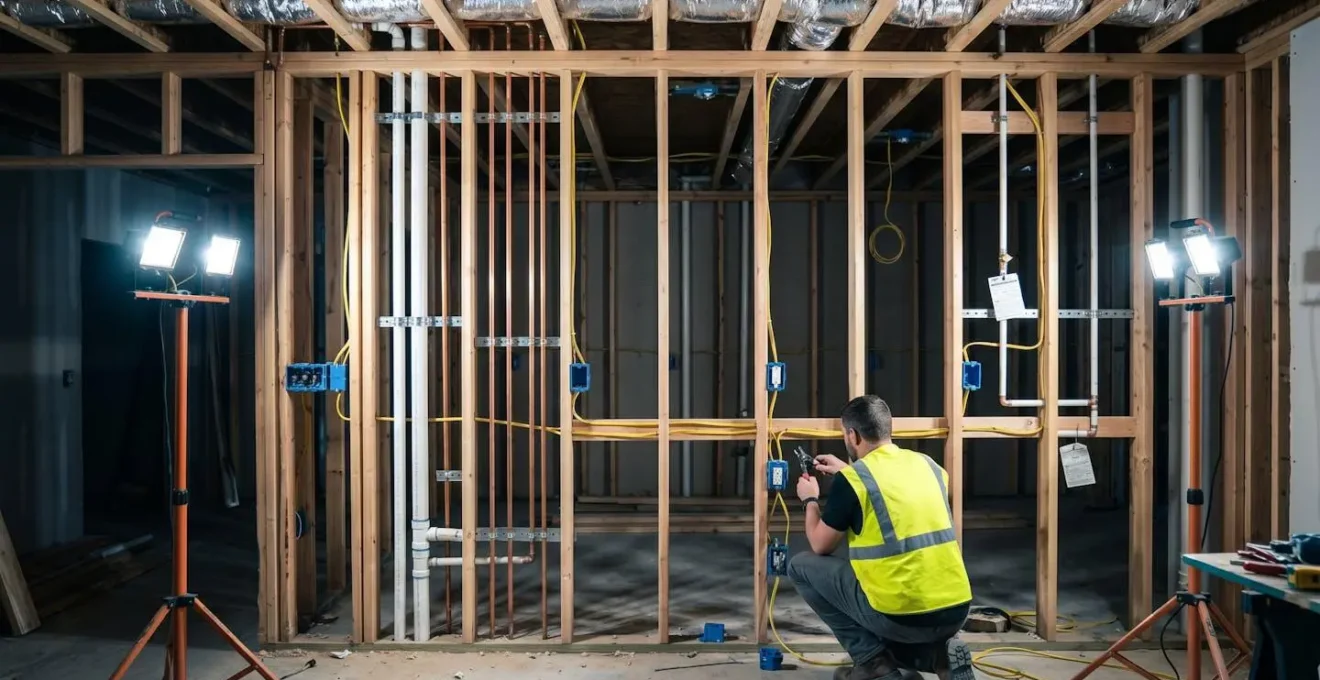
The rough-in phase is where homeowners feel stuck. This 2-3 week period installs plumbing, electrical, and HVAC behind walls—yet shows almost no visible transformation. Copper or PEX plumbing lines run to new locations. Romex electrical cables snake through studs to power new circuits.
This phase cannot be rushed. Ontario Building Code requires inspections at critical checkpoints: plumbing rough-in must be inspected before walls close, and electrical rough-in requires ESA approval before drywall proceeds.
Consider an Ottawa homeowner in the Glebe whose 1975 kitchen revealed outdated knob-and-tube wiring during demolition—requiring immediate electrical panel upgrade. With a 15% contingency budget already allocated and a 1-week timeline buffer built into the schedule, the licensed electrician completed rewiring within 4 days without derailing the overall project. This scenario illustrates why contingency planning matters: unforeseen issues become manageable adjustments rather than project-ending crises when homeowners plan for the unexpected from day one.
| Renovation Phase | Typical Duration | Visible Progress to Homeowner |
|---|---|---|
| Planning & Permits | 2-3 weeks | 0% — paperwork only |
| Demolition | 1-2 weeks | 20% — empty space visible |
| Rough-in Infrastructure | 2-3 weeks | 5% — wires and pipes, nothing finished |
| Drywall & Finishing | 1 week | 40% — walls look complete |
| Installation | 2-3 weeks | 90% — kitchen transformation visible |
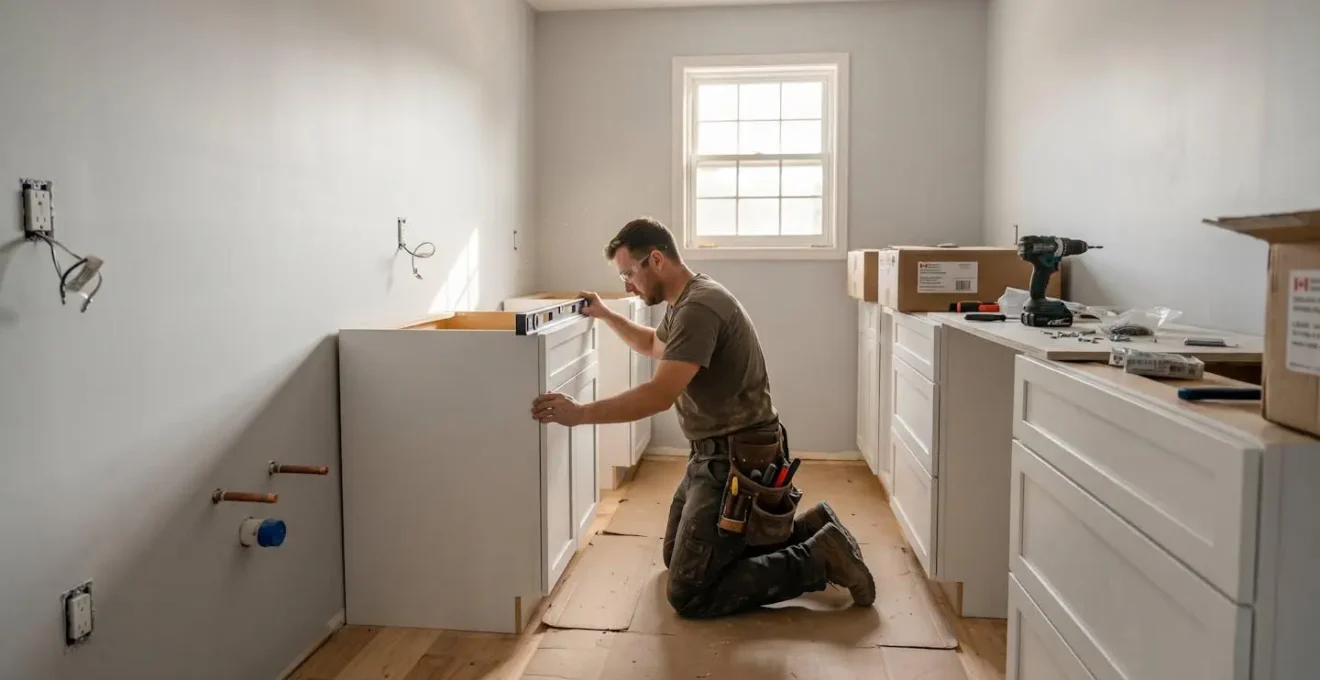
Assembly sequence: Installing your new kitchen in the right order
Installation isn’t arbitrary—each step enables the next, and wrong sequencing causes expensive rework. The 2-3 week installation phase follows a strict dependency chain where precise measurements rely on completed prior work. Drywall must be finished and painted before cabinets arrive, as installers need smooth, level walls. Flooring installation typically occurs before cabinets, though this varies by material.
-
Drywall installation, taping, and painting complete
Walls fully finished before cabinet delivery to prevent damage from construction dust.
-
Flooring installation (if replacing existing)
Hardwood, tile, or vinyl typically installs before cabinets to avoid precision cutting.
-
Base cabinet installation and precise leveling
Installers use shims to achieve perfectly level cabinet runs as reference plane.
-
Countertop templating (after cabinets fully leveled)
Professional templators measure exact dimensions and mark cutouts. Fabrication requires 1-2 weeks.
-
Countertop fabrication and installation
Stone fabricators cut slabs to specifications, install with sink attachment and plumbing.
-
Backsplash tile installation
Tile setters work from countertop surface upward, ensuring tight fit with first row.
-
Upper cabinet and open shelving installation
Wall cabinets mount after bases, using them as height reference for alignment.
-
Appliance delivery, placement, and final connections
Refrigerators, ranges, dishwashers arrive last. Electricians and plumbers make final hookups.
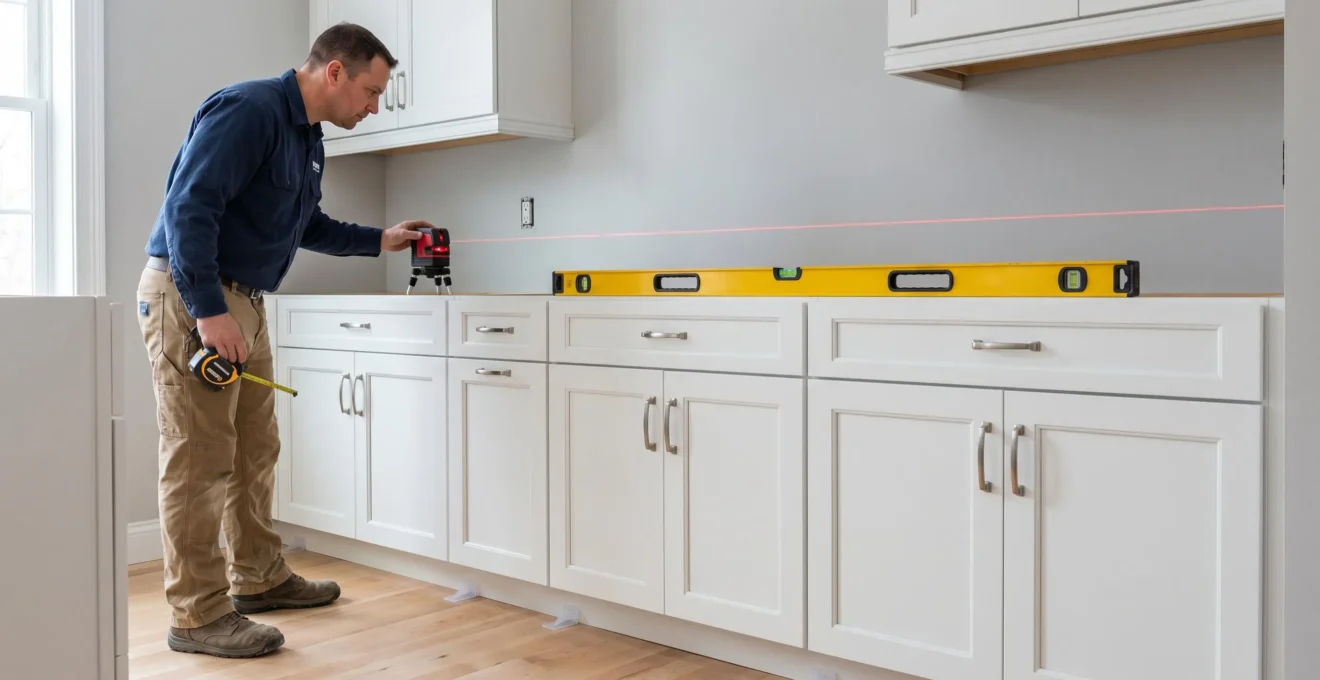
Cabinets first: Why they set the stage for everything else
Cabinet installation establishes the reference point for all measurements. Installers use laser levels and shims to achieve perfectly level cabinet runs within 1/16 inch tolerance—otherwise countertop templating captures these errors, resulting in sloped counters where water pools or gaps between countertop and wall.
Countertops and backsplash: Measuring after cabinets are level
The most common sequencing error is ordering countertops before cabinets are installed. Countertop fabricators require exact measurements from leveled cabinets because cabinet height variations translate to visible gaps. Professional templators visit after base cabinets are secured, capturing precise dimensions. Fabrication takes 1-2 weeks. Backsplash installation occurs after countertops.
Appliances and final connections: Last pieces of the puzzle
Appliances arrive last to prevent construction damage. Licensed electricians and plumbers make final connections and test for leaks before final inspection.
What homeowners ask us most about the renovation process
How long will we actually be without a functioning kitchen?
The complete renovation timeline spans 6-12 weeks, during which your kitchen will be non-functional. Most homeowners set up a temporary kitchen in the dining room or basement with a microwave, mini-fridge, portable induction cooktop, and toaster oven. This reduces reliance on restaurant meals and maintains meal preparation capability throughout the project.
Can we realistically live in the house during renovation?
Yes, for most kitchen projects. Professional contractors install floor-to-ceiling plastic barriers with zipper access doors to contain dust, and run HEPA filtration systems. Work typically occurs weekdays 8am-4pm, leaving evenings and weekends for family use. Sealing HVAC vents in the construction zone prevents dust circulation. The inconvenience is manageable with proper containment.
What happens if you discover mold or outdated wiring behind the walls?
Unforeseen structural issues appear in many renovation projects, particularly in Ottawa homes built before 1980. Industry best practices recommend budgeting 15-20% contingency funds specifically for these discoveries. Quality contractors build a 1-week timeline buffer to address unexpected conditions. Mold remediation, electrical panel upgrades, or plumbing re-routing can typically be resolved within this buffer.
Do we really need building permits for kitchen renovation work?
In Ottawa, yes—building permits are required when renovation includes structural changes, new plumbing installations, or electrical circuit modifications. Professional contractors typically handle permit applications, coordinate inspections, and ensure Ontario Building Code compliance. Permit approval adds 1-2 weeks to project start but protects homeowners from code violations discovered during home sale inspections or insurance claims.
What to prioritize before signing your contractor agreement
The kitchen renovation process succeeds when homeowners enter with realistic timeline expectations and finalized material decisions. The rough-in phase will test your patience with its 2-3 week duration and minimal visible progress, but enables the dramatic transformation during installation.
Experienced contractors prioritize proper sequencing over speed. Cabinets must be leveled before countertop templating. Backsplash follows countertops. Appliances arrive last. These dependencies prevent expensive rework.
Advice for Ottawa homeowners: Prioritize contractor selection based on permit handling expertise and transparent communication. Allocate your 15-20% contingency budget at project start, not as an afterthought.