The frustration of a garment failing prematurely—a popped button, a ripped seam—is not bad luck; it’s a failure of engineering. Instead of relying on brand names or price tags, adopting a quality inspector’s mindset allows you to dissect a garment’s construction. This guide provides the technical framework to analyze fabric, stitching, and hardware, empowering you to identify the specific failure points that differentiate a five-year workhorse from a five-wash disposable.
There’s a universal moment of disappointment that every man has experienced: the distinct *pop* of a button thread giving way, the grating sound of a zipper failing, or the discovery of a seam that has surrendered after only a few months of wear. The common reaction is to blame the brand or lament the decline of quality in modern manufacturing. We’re often told to « check the seams » or « feel the fabric, » but these vague platitudes offer little real guidance. They fail to address the core issue: a garment is an engineered product, and its longevity is determined by a series of specific material and construction choices.
The real secret to building a wardrobe that lasts isn’t about spending more money blindly; it’s about spending it wisely. This requires shifting your perspective from that of a consumer to that of a quality control inspector. It means understanding the *why* behind garment failure. Why do poly-blends pill more than pure cotton? What is « seam efficiency » and how does it predict a work jacket’s lifespan? Why can the choice between a plastic and a metal zipper define the entire life of a jacket? These are not matters of opinion but of textile science and mechanical engineering.
This guide abandons generic advice in favor of a technical, systematic inspection process. We will move beyond the surface and analyze the critical components that determine a garment’s structural integrity and durability. By learning to identify the subtle but crucial markers of quality—from fabric density measured in GSM to the construction type of a boot—you can accurately predict whether a piece of clothing is a long-term investment or a future landfill contributor. It’s time to stop buying clothes and start investing in engineered goods.
This article provides a systematic, inspector-grade checklist for evaluating garment quality before you buy. Below is a summary of the key inspection points we will cover, from the microscopic fabric level to the overall construction.
Summary: A Quality Inspector’s Guide: How to Vet a Garment’s Stitching to Guarantee a 5-Year Lifespan
- 100% Cotton vs. Poly-Blend: Which Fabric Pilling Sign Should You Avoid?
- Single vs. Double Stitch: Which Seam Holds Up in Workwear?
- Plastic vs. Metal Zippers: Why the Zipper Choice Defines the Jacket’s Life?
- The ‘Lightweight’ Mistake That Often Means Low Quality in Knits
- How to Scratch Test Leather to Ensure It’s Not Plastic Coated?
- Heavyweight or Lightweight Cotton: Which Is Better for Daily Wear?
- Why Buying One $300 Pair of Boots Is Cheaper Than Four $80 Pairs?
- Which ‘Buy It For Life’ Boots Are Worth the $400 Price Tag?
100% Cotton vs. Poly-Blend: Which Fabric Pilling Sign Should You Avoid?
The first point of inspection begins at the fiber level. Pilling—the formation of small, fuzzy balls on a fabric’s surface—is often mistaken for a sign of wear, but it’s fundamentally a structural failure of the fibers. While all soft fabrics can pill, the severity and speed are directly linked to fiber composition. Your inspection must therefore differentiate between natural and synthetic fibers.
Synthetic fibers like polyester, nylon, and acrylic are extremely strong. When their short staple fibers break and tangle from abrasion, they don’t break off the garment. Instead, they are held firmly in place by the stronger fibers within the yarn, forming highly visible and persistent pills. In contrast, natural fibers like cotton and wool are weaker. When their fibers pill, the resulting fuzz balls tend to break away from the surface more easily, making the pilling less noticeable and self-limiting. As a rule, the more synthetic content in a textile, the more aggressive the pilling will be.
From an inspector’s standpoint, any visible pilling on a new poly-blend garment in-store is a major red flag. It indicates that the fabric structure is already unstable and will degrade rapidly with minimal wear and washing. While a 100% cotton garment may show slight fuzzing, it’s a less critical defect. Your objective is to check the fabric composition tag first. If the garment contains a significant percentage of polyester or acrylic, run your hand firmly across the surface. Any detection of nascent pills means the garment is destined for a short, fuzzy life. Prioritize fabrics with a higher percentage of natural fibers for items that will experience high friction, such as sweaters and trousers.
Single vs. Double Stitch: Which Seam Holds Up in Workwear?
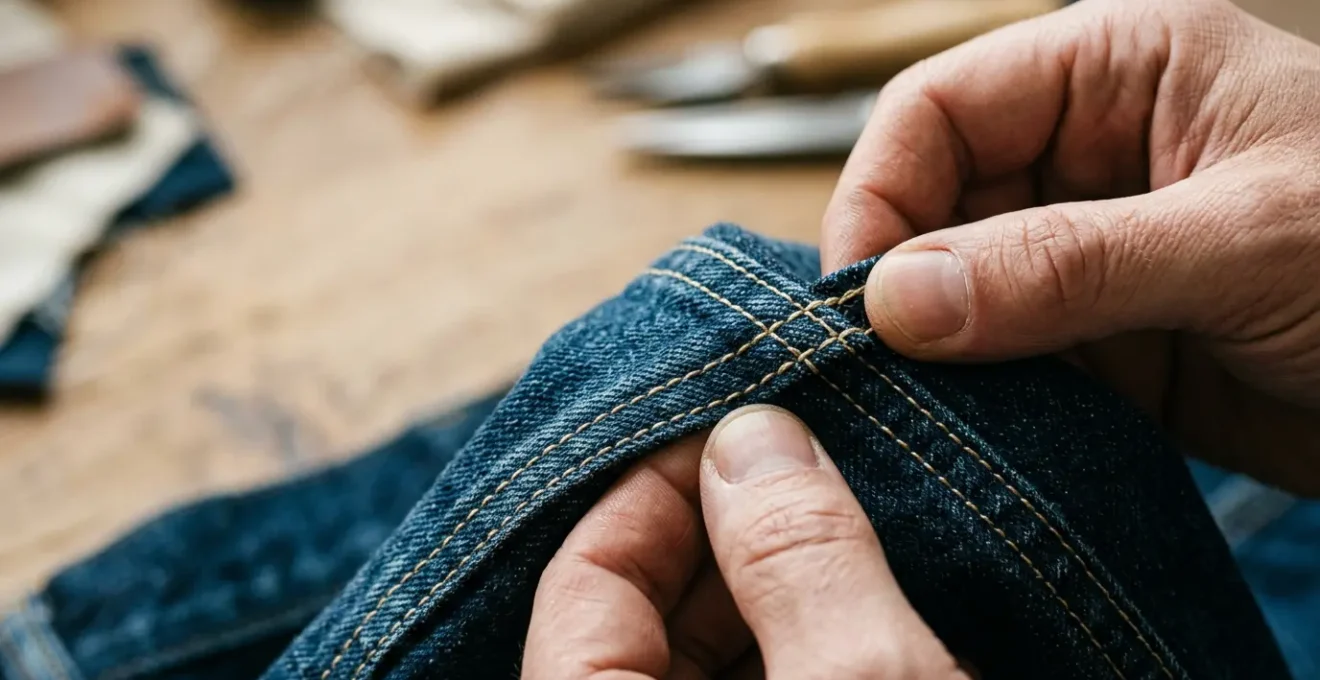
A garment is only as strong as its weakest seam. The stitching is the skeleton that holds the fabric together, and its integrity is paramount, especially in high-stress garments like workwear. A quality inspector doesn’t just see a line of thread; they analyze stitch type, density, and placement relative to the garment’s stress points.
The most common stitch is the single-needle lockstitch, which is perfectly adequate for fashion items. However, for garments subjected to tension and abrasion, such as jeans or a canvas jacket, you must look for reinforced stitching. A double-needle stitch (two parallel rows) or a flat-felled seam (where the fabric edges are folded over and sewn flat, common on the inseam of jeans) provides critical redundancy. If one line of thread fails, the other holds the seam together.
As the diagram shows, critical areas like shoulders, armholes, and side seams on a work jacket demand superior construction. Beyond the type of stitch, inspect the stitch density, or stitches per inch (SPI). A low SPI (fewer than 8) uses less thread and is faster to produce, but it creates a weaker seam that is more likely to pucker or burst under strain. A high-quality garment will feature a higher SPI (10-14), creating a smoother, more durable seam. Finally, look for bar tacks—a series of dense, repetitive stitches—at specific stress points like pocket corners, belt loops, and the fly opening. The absence of these reinforcements on a utility garment is a clear sign of cut corners in manufacturing.
Plastic vs. Metal Zippers: Why the Zipper Choice Defines the Jacket’s Life?
A zipper is one of the few mechanical components on a garment, and its failure often renders the entire piece unusable. The choice of material and construction for this single part is a powerful indicator of the manufacturer’s overall commitment to quality. From an inspector’s view, a zipper is not just a closure; it’s a point of potential catastrophic failure.
There are two main types to consider: coil (usually plastic) and tooth (plastic or metal). Coil zippers are flexible and cheap, made from polyester coils stitched onto a fabric tape. They are suitable for light applications but are highly susceptible to abrasion and UV degradation. Molded plastic tooth zippers (like Vislon) offer a step up in durability for outerwear. However, for heavy-duty applications, nothing surpasses a metal tooth zipper. Brands like YKK are industry standards for a reason; their metal zippers, typically made of brass, aluminum, or nickel, offer superior strength and wear resistance. The teeth are individually clamped onto the tape, making them far more robust than a sewn-on coil.
Case Study: Environmental Impact on Zipper Failure
A technical analysis of zipper failures in demanding marine and industrial settings provides a critical insight. According to engineering documentation from Lenzip on equipment cover failures, products rarely fail due to fabric strength alone; the primary cause is poor zipper selection. Environmental factors are a major threat, with salt spray being particularly aggressive. Chloride ions can penetrate protective coatings and attack the underlying metal, demonstrating that even with metal zippers, the specific alloy and its corrosion resistance are crucial for longevity in harsh climates.
Your inspection should be forensic. First, identify the brand—a YKK stamp on the puller is a good sign. Second, assess the material. For a winter coat, work jacket, or leather piece, a flimsy coil zipper is an immediate disqualification. Look for a robust metal or heavy-duty molded plastic zipper. Third, operate it. The pull should be smooth, without catching or hesitation. A gritty or difficult pull suggests poorly formed teeth or incorrect alignment, a defect that will only worsen over time.
The ‘Lightweight’ Mistake That Often Means Low Quality in Knits
When inspecting knitwear like t-shirts, polos, or sweaters, the term « lightweight » is often used as a marketing positive, implying comfort and breathability. However, from a quality control perspective, it can also be a euphemism for « low density » and « poor durability. » The key to distinguishing a quality lightweight knit from a cheap one is an objective metric: Grams per Square Meter (GSM).
GSM is the standard measure of fabric weight and, by extension, its density and opacity. A lower GSM means less yarn was used to create the fabric, resulting in a thinner, more transparent, and less durable material that is prone to stretching out of shape and developing holes. While there’s a place for very light fabrics, a quality t-shirt should fall within a specific range. As a benchmark, industry standards establish that a quality lightweight t-shirt should be between 160-200 GSM. Anything below 150 GSM should be viewed with suspicion, as it’s likely to become transparent after a few washes. For sweatshirts and hoodies, the standard is much higher, typically 250-350 GSM.
Since you can’t measure GSM in a store, you must use a proxy test. Hold the garment up to a light source. Can you easily see through the fabric’s knit structure? If so, the density is likely too low. A well-constructed knit should have a tight, consistent weave that offers opacity. Next, perform a stretch test: gently stretch a section of the fabric (like the hem) and see if it snaps back to its original shape immediately. A low-quality knit will be slow to recover, a clear sign that it will sag and lose its form over time.
Action Plan: Verifying Fabric Quality Beyond Weight
- Check knit density: Hold the fabric against a light source to assess durability and opacity of the structure. A transparent fabric indicates low density.
- Perform stretch recovery test: Gently stretch the fabric and observe its snap-back behavior. Immediate recovery signifies good elasticity.
- Verify fiber content: Read the composition label to understand the raw materials, which dictates pilling and care requirements.
- Assess colorfastness (visual check): Look for even color distribution and check high-friction areas for premature fading on the hanger.
- Run pilling and abrasion tests (in-store proxy): Firmly rub a hidden area of the fabric against itself to see if fibers begin to lift or form pills.
How to Scratch Test Leather to Ensure It’s Not Plastic Coated?
Leather is a premium material, but the term is widely abused. Much of what is sold as « genuine leather » is, in fact, corrected-grain leather coated with a layer of plastic (polyurethane) to hide imperfections. This coating negates many of leather’s best qualities—breathability, patina potential, and durability. An inspector must be able to differentiate authentic, full-grain leather from its plastic-coated inferiors.
Full-grain leather is the top layer of the hide with its natural grain and imperfections intact. It is strong, breathable, and develops a beautiful patina over time. Corrected-grain leather has had its surface sanded down and an artificial grain pattern embossed onto it, sealed with a synthetic coating. While it looks uniform and perfect initially, this plastic layer will eventually crack, peel, and will never develop a patina. It effectively turns a natural material into a synthetic one.
The « scratch test » is a simple but effective field test. Lightly run your fingernail across an inconspicuous area of the garment. Real, uncoated leather will show a subtle color change or a light mark that can be buffed away with your thumb. This indicates the fibers have been temporarily displaced. A plastic-coated surface, however, will resist the scratch completely, or if you press hard enough, it may show a permanent, unnatural-looking white scratch where the coating has been damaged. Another test is the water drop test: a single drop of water on unfinished leather will slowly be absorbed, darkening the spot temporarily. On coated leather, the water will bead up and sit on the surface, just as it would on a raincoat.
Heavyweight or Lightweight Cotton: Which Is Better for Daily Wear?
The choice between heavyweight and lightweight cotton is not a simple matter of preference; it’s an engineering decision based on intended use. Applying the concept of GSM, we can select the optimal cotton fabric for any scenario, from office wear to a summer weekend. A quality inspector understands that « better » is always relative to function. A heavyweight fabric is not inherently superior to a lightweight one if it’s used in the wrong context.
A heavyweight cotton (e.g., 350-450 GSM twill for chinos) offers excellent durability, structure, and insulation, making it ideal for cooler weather and rugged use. It resists wrinkling better and holds a sharper silhouette. However, its lack of breathability makes it unsuitable for warm climates or active use. Conversely, a lightweight cotton jersey (120-160 GSM) provides maximum breathability and a soft drape, perfect for a summer t-shirt. Its drawback is a lower durability and a tendency to lose shape if the knit quality is poor. The sweet spot for versatile, all-season garments like an Oxford cloth button-down shirt is often a mid-weight cotton (around 250-300 GSM), balancing comfort, durability, and a professional appearance.
The following table breaks down the recommended cotton weights for various daily wear situations, providing a technical framework for your purchasing decisions.
| User Scenario | Recommended GSM | Cotton Type & Weave | Key Benefits |
|---|---|---|---|
| Office Commuter | 250-300 GSM | Mid-weight Twill or Oxford Cloth | Wrinkle-resistant, professional appearance, all-season comfort |
| Weekend Errand-Runner | 160-185 GSM | Lightweight Pima Cotton Jersey | Breathable, soft drape, casual comfort |
| Summer T-Shirt | 120-160 GSM | Lightweight Jersey | Maximum breathability, moisture management |
| Winter T-Shirt | 200-300 GSM | Heavyweight Jersey | Warmth retention, durability, structured feel |
| Winter Chino/Trousers | 350-450 GSM | Heavy Twill Cotton | Cold weather protection, enhanced durability |
This data, based on an in-depth analysis of fabric weights, demonstrates that matching the fabric’s physical properties to your lifestyle is essential. Inspecting the garment’s hang tag for fabric weight information or using the « light test » as a proxy allows you to make an informed, engineering-based choice rather than an emotional one.
Key Takeaways
- Garment failure is an engineering problem, not bad luck. Inspect construction, not just brand labels.
- Fabric pilling is worse on synthetics (polyester) because the strong fibers don’t break off. Visible pilling in-store is a major red flag.
- Durability lies in the details: look for high stitch density (SPI), double-stitching or flat-felled seams at stress points, and bar tack reinforcements.
Why Buying One $300 Pair of Boots Is Cheaper Than Four $80 Pairs?
The final pillar of a quality inspector’s mindset is understanding the cost-per-wear calculus. A higher upfront price often correlates with superior materials and construction methods that dramatically extend a garment’s life, resulting in a lower long-term cost. This is nowhere more evident than in footwear. Buying four pairs of cheap, cemented-sole boots over five years is an economic fallacy compared to investing in one pair of well-made, serviceable boots.
The key differentiator is construction and the quality of its components. An $80 boot typically uses a cemented sole, where the sole is simply glued to the upper. This method is fast and cheap, but once the sole wears out or detaches, the boot is irreparable and must be discarded. Furthermore, these boots often use corrected-grain leather and feature seams with low efficiency. Technical research on garment durability indicates that seam efficiency, the ratio of a seam’s strength to the fabric’s strength, is a critical metric. In cheap manufacturing, this can be as low as 60%, creating a built-in failure point.
In contrast, a $300 boot is an engineered system. It likely features a Goodyear welt or Blake stitch construction, where the sole is stitched to the upper. This makes the boot fully resoleable by any competent cobbler, meaning its lifespan is not limited by the life of the outsole. It will use full-grain leather that can be conditioned and will patina, and its seams will be engineered for high efficiency with robust thread. Over five years, the $300 boot that is resoled once for $75 will cost $375. The four pairs of $80 boots will cost $320 and have generated significantly more waste. The slight premium for the quality pair buys you superior comfort, better performance, and a dramatically longer service life.
Which ‘Buy It For Life’ Boots Are Worth the $400 Price Tag?
The concept of « Buy It For Life » (BIFL) is the ultimate goal of the quality-conscious individual. It represents a shift from disposable consumption to investing in items designed for longevity and serviceability. When it comes to a $400 pair of boots, the price tag is not for a brand name; it’s payment for a specific set of engineering and material criteria that ensure a multi-decade lifespan. Your final inspection, therefore, is a checklist for these BIFL attributes.
Forget specific brands for a moment and focus on the technical specifications. A true BIFL boot must meet these non-negotiable standards:
- Resoleable Construction: The boot must feature a stitched construction, most commonly a Goodyear welt. This is the single most important feature, as it allows the worn-out sole to be replaced indefinitely, separating the life of the upper from the life of the sole.
- Full-Grain Leather Upper: The upper must be made from high-quality, full-grain leather. This material is durable, breathable, and capable of developing a rich patina. It can be maintained with conditioners and will mold to your foot over time. Avoid « genuine » or « corrected-grain » leather.
- Structural Support: Look for a leather or steel shank embedded in the midsole for arch support, and a structured heel counter that prevents the heel from collapsing. These internal components are invisible but crucial for long-term comfort and stability.
- Quality Hardware: Eyelets and speed hooks should be made of solid brass or nickel, securely anchored into the leather. Flimsy, painted metal hardware will chip and rust, compromising the boot’s integrity.
A $400 price tag that includes all these features is not an expense; it is a capital investment in your wardrobe. It represents a commitment to a product that can be repaired, not replaced. This is the pinnacle of the inspector’s mindset: recognizing and valuing the engineering that creates true, lasting quality.
Adopt this inspector’s methodology for every purchase. By systematically evaluating materials, construction, and hardware, you transform shopping from a game of chance into a calculated process of acquiring durable, high-value assets for your wardrobe.